project log...
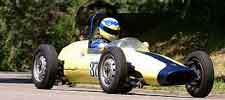
1964 Quantum Motorcars Formula S
This car was offered by Quantum Motorcars as their entry into the SCCA's "Formula S" racing class. Unfortunately, the class never got off the ground. There were 60-some kits produced, with only a portion of those originally being built into cars. Not many cars or kits exist today and only a few are racing.
|
Date |
Description |
|
|
| 06-29-08 |
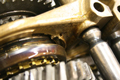
We ran it as best we could and then once we got it home we opened up the gearbox to find the shift forks were severly worn. A lot of brass had been moved around. Some was mushrooming off the forks and a bunch was sitting in the bottom of the gearcase. One theory is that the reverse lockout wasn't always working as well as it should, and that might have been a contributing factor. I'm not really convinced. We replaced the shift forks with a set of good-used. |
| 11-04-07 | The car ran very well at Summit Point, Shenandoah.
The day was ended when we siezed the bearing in the waternator due to an overtight belt. |
| 08-09-07 |
|
| 07-16-07 | It all went OK. There was a lot of great running, then one very low point when it mattered, then finally a very high point to finish it off. |
| 07-13-07 | Loaded up and Jeremy towed it out to the PVGP. |
Re-painted the blue. It's not greak, but OK. It will have to do. |
|
Dad painted the blue on the body, but isn't happy with the results. We're going to redo it. |
|
| 07-01-07 |
I added a small spring to the reverse lockout lever (to prevent interference on the downshift to 2nd). Also put the sticker on the brake balance adjuster, so I know which way to turn it. After that, it was mostly cleaning things up, tieing things down, dotting the i's and crossing the t's. Dad did more fiberglass repair and has now progresses to the bondo stage. |
| 06-30-07 | Dad drilled and tapped some holes for the coolant overflow tank. Later he started worked on repairing, yet again, the cracks in the fiberglass around the front suspension area. Put fluid in the brake and clutch system and WE'VE GOT PEDAL! No leaks either (which is a little worrysome, actually). I still want to do another bleed all-around but hey, they seem to work. No idea where the balance is set though. None whatsoever. |
| 06-28-07 | I made brackets for, mounted and plumbed the fluid resevoirs for the clutch and brake master cylinders. I hooked up the brake balance adjuster and finished fabrication of the lower coilover spring perches. |
| 06-27-06 | Continued fabrication of the lower coilover spring perches. Made certain all the brake line connections were tight. I still expect some leaks, but at least I tried. |
| 06-26-07 | Started fabrication of the lower coilover spring perches. |
| 06-25-07 | Started fabrication of a new bracket for the coolant overflow bottle. Dad started final assembly of the pedal cluster. |
| 06-24-07 | Finished testing the new springs with various spacers in order to locate the correct ride height. Made small gusset pieces for the front spring perches and welded them in place. Welded up the cracks in the chassis wherever we could find them, primarily at the spring perches. Cleaned, primered and painted all weld repairs. Dad worked on finishing the clutch pedal and prepping the ex-fire extinguisher as a catch bottle. |
| 06-23-07 | Started to test the new springs with various spacers in order to locate the correct ride height. |
| 06-21-07 | Bolted on the newly fabricated, primered, painted, dropped and repainted rear drivetrain mount. I drilled and tapped a hole for the rain light and mounted the light. I also drilled a hole for the aux battery hookup and mounted that. I reinstalled the bolt holding the tailpipe in place, with a double-nut setup instead of a nylock. I installed it with some freeplay to hopefully keep from stressing it too much. I need to purchase some extra tall nuts for the rear drivetrain mount. You can't get a wrench on a bunch of them otherwise. This includes the bolts that double-duty as the inner connection for the rear-steering lockouts. I also need to get some jamb-nuts for the heim joints for those steering lockouts. |
| 06-20-07 | Sanded out the grass and repainted the rear drivetrain mount. |
| 06-19-07 | Painted the rear drivetrain mount and promptly dropped it in the grass. |
| 06-11-07 | Sandblasted and primered the new rear drivetrain mount bracket thingie. |
| 06-10-07 | Dad bent and test fitted the brake and clutch lines. They all fit now, but we still need to tighten everything, mount the resevoirs, attach the balance bar adjuster, test fill with fluid and (fix the inevitable leaks) before we are done with this part of the job. |
| 06-09-07 | Stared by running errands... Picked up the MIG and the brake/clutch lines. Welded the lathe-turned bit to the rear drivetrain mount and test fitted... GOOD! |
| 06-08-07 | Sandblasted and painted the pedal bracket while Dad made and fitted a bracket for the brake balance bar adjuster. |
| 06-07-06 | Dad ordered a new set of shocks and springs and a couple heim joints for the rear suspension. |
| 06-06-07 | I cut the hole in the bracket for the newly arrived rear drivetrain mount, finish ground and fit the lathe-turned bit. Then I tacked it in with the oxy-acetylene torch. I also welded a couple nuts onto the pedal bracket for a clutch stop and brake stop, though I doubt we'll need them. |
| 06-05-07 | The southern contingent sent back the lathe-cut portion of the rear drivetrain mount and it arrived today. Looks good. |
| 05-30-07 | HUGEMUNGOUS update:We've been hard at work. We have two major projects underway.
And at least one minor project.
Last one first... Last night we removed the rest of the shocks and springs. Yes, all the shocks are shot. They have a Delco number on them (put number here) so maybe they will cross reference with something in the current AC Delco lineup? To fix the trans mount issue, we've completely changed tactics. Rather than bolt the trans to the chassis using the rear cover case bolts, we are fabricating a bracket that bolts to the rear of the chassis and will capture the stock trans mounting "nose". That should fix it. We've been hard at work getting the pedals fabricated and put together. Last night we made good progress and finally did some finish-welding. Just enough to empty my acetelyne bottle! OK, maybe not "hugemungous" exactly. But, significant in terms of performance and reliability! |
| 11-05-06 | Event: VSCCA at Summit Point Shenandoah course. |
| 10-28-06 |
|
| 10-18-06 | Ordered 6 sets more sparkplugs from sparkplugs.com.
|
| 10-01-06 |
|
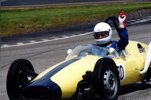
| 07-15-06 | The PVGP went quite well for me. I managed my first "clean" race since I started driving there in 2003. Previously, I had either had a mechanical failure (2003), hit a haybale (2004 & 2005), hit a feathered friend (2005), or spun off course (2005). This year, finally, I managed to keep it on the black stuff and struggle to the end without mechanical failure!
VIDEO!Click here to view the low-res YouTube version. However, it was far from easy. That was probably the hardest race I've ever run. The car was handling SO poorly and was just all over the road. It may be difficult to see in the video but trust me, it was work just going STRAIGHT! |
| 07-08-06 | Beaver Run was not that great an outing for Dad and the Formula S. Early on, the car was very twitchy. Dad put a little more toe-in on the rear and that helped. This engine is definitely NOT one of our best. It just doesn't have any power. In the Saturday race Dad was running 3rd from last in the Formula V and Junior class. The V's all have a lot more tire than the S and generally, more power too. (Even though I'm not sure they should. But that's the modern vintage V engine for you.) Dad is generally OK. He bruised his middle toe on his right foot and his rear-end is sore from when the car landed. Otherwise fine. It was deemed as a racing incident and not aggressive... But folks, PLEASE, this is VINTAGE RACING, when you are passing in a braking zone, do NOT pull over in front of the car you just passed. You've already won the corner, just turn-in from where you are and continue on. ESPECIALLY when you have better brakes than the car you just passed. They cannot stop as quickly as you, obviously. In this case the V driver had better brakes and better power, but was not cornering as quickly as Dad in the Formula S... So Dad was suprised when the car passing him slowed down so abruptly and so much MORE than he thought was necessary. |
| betwixt | We got the new A-arms all ready, but then couldn't use them. They were too long. So we made some spacers for the old ones instead. All buttoned up, we headed off to the PVGP Historics. |
| 06-19-06 | I sandblasted the two lower A-arms and found that one had the shock mount bolt thread stripped. Shoot. We'll have to make some repairs. |
| 06-14-06 | Dad has been plugging away on this. Rather than make the modifications for my Sonett III box to fit the chassis, he had the old gearbox welded up so he could refit it. Now, the transmission is back in the car and it awaits only the new A-arms to fix the track width. I have to get some sandblast media and new nozzles and get them cleaned and painted. |
| 06-03-06 | Earlier this week Dad had removed the gearbox and found that one of the rear mounting points had borken free. Cracked gearcase. Oil leaked out. Messy. The internals are fine however. He searched through all his spare gearboxes (including one of mine he had at his house) and couldn't find one good one in the bunch. I had one more, from my '74 Sonett, at my house and seperated it and openend it up to take a look. A little corrosion here and there but overall it seems OK. So he'll clean it up and use that one. |
| 05-21-06 | We made no changes to the car before going to NHIS for the Vintage Celebration... We didn't want to screw anything up. ;) We DID start running with the bodywork on and left it on all weekend... As the car ran pretty well for the duration. Dad reported that it didn't seem to have the power it should, but otherwise ran well. When he came in from the last race of the weekend, the car was leaking fluids. Both water and gear oil. Note: The dang thing leaked ALL THE WAY HOME and made a complete mess of the Sonett. Grr. |
| 05-01-06 | The car gave us no end of trouble at VIR. To let Dad get some decent laps in, I traded the Sonett to him for a session and I took the Formula S out. I could keep it running but the brakes were AWFUL. They were grabbing and yanking me all over the track AND they were weak and all the way on the floor (still). The really bad cornering vibration has returned. I was managing when we got a black flag ALL due to a flipped MG TD. On the in-lap the car overheated so I parked it. Seems it had a big air bubble. We tried to send Jeremy out in the car but in the rush Dad didn't get the cap on the fuel cell properly. Fuel gushed out onto the tires and sent Jeremy spinning at the end of the first corner. Not a great intro to the car really. It refused to run properly until the last two sessions. The only thing Dad did was remove the rear bodywork. THAT shouldn't have made any difference? But run it did. Dad gained almost 1000 rpm at the end of the straight and finally got a chance to do some dicing. Now what? |
| 04-25-06 | Car is loaded on the trailer ready to roll. VIR here we come! |
| 04-24-06 | Dad removed the white number ball (it was dirty and uncleanable) and put Jake's number 37 on the car. |
| 04-23-06 | I installed the new spark plug adapters with NGK BR8EIX sparkplugs, new distributor rotor and cap (shaved to fit) (from West Of Sweden). The car fired right up on this setup, so things seem to be working. I also have a set of NGK BR9EIX plugs in case the 8's prove to be too hot. |
| 04-22-06 | The decision was made to re-assemble the BR7 distributor as it was, with points, to keep as a backup. A BR3 distributor was fitted with the Pertronix and installed in the car. Once we got the timing correct, it fired right up! It sounded better than it had in a long time, so we are hopeful. |
| 04-16-06 | Dad moved the Formula S from the warehouse to his garage. Later, he removed the distributor so he could inspect it and see how the Pertronix Ignitor might be fitted to the BR7. |
| 04-09-06 | Dad went and retrieved the car from Jake's and dropped it at Bill's warehouse. It is closer and as soon as we clear room we'll bring it to my garage and try to get her fixed up and running right. |
| 04-07-06 | Ordered NGK Iridium spark plugs (14mm) to use with the spark plug adapters. |
| 03-20-06 | I bought some sparkplug adapters (from West Of Sweden) for this car and the Quantum One, so we would be able to use NGK Iridium plugs. I still need to decide on plug temp and get some of them. |
Dad drove the Formula S at the VRG event at Summit Point - Shenandoah course. It ran decently well he says, right up until just before it ran out of gas, when it ran GREAT! Then, predictably, it ran out of gas. After that, it wouldn't run on all three cylinders. Nothing we did could fix it. I don't know what is wrong. I suspect fire, but it could be fuel too. |
|
I affected some repairs to the crash damage from Pittsburgh. Unbending and such. |
|
We took the Formula S to the Pittsburgh Vintage Grand Prix again. The engine was not running well, but I was making laps. It seemed to get better the longer it ran, so I kept at it. The power wasn't quite right and it didn't want to run hardly at all under 4000 rpm. I don't know what its problem was. |
|
| 03-20-05 | GT crank rebuilt by West of Sweden. |
| 02-13-05 | For reference, these are scans of an orginal sales brochure for a Quantum Formula "S" |
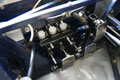
| 02-01-05 | For reference I took some snapshots of three SAAB manifolds fitted with Solex PII 44 carbs. |
| 01-25-05 | I've come across this motor that used to be in another Formula S. That car's owner at the time removed the motor because it kept breaking piston rings and he was tired of rebuilding it. Normally, I'd run screaming from such a thing as I rather dislike unreliable motors now... But this one is special. It is approximately 1 liter in displacement and was reputed to have run like a raped ape. I could use some of that, or alternatively, a lasoo. See the video from Summit Point (in which I do the damamge that is shown in these pictures) to understand why more power is tops on my wish list. Anyway, in case you are interested... this is what the 1 liter motor looks like right now as it sits on my workbench. Yes, it needs some work. |
| 12-05-04 | So, Dad got the engine out today and this evening we pulled it apart to see what I have wrought. Well, to put it bluntly I have wrought a stinking mess. |
| 11-27&28-04 | We went to the VSCCA Turkey Bowl races at Summit Point. The car ran really well, right up until it blew. |
| 07-14-04 | I put the front bodywork on the car and am putting the final screw in place when Dad shows up with Saabina. He's got the rebuilt starter with him and so we decide to put it in and just hope it works. It works! We put the rest of the bodywork on and put covers over the carb and put it on the trailer. Ready to go. Nothing like the last minute... Dad leaves with it behind the red Aero tomorrow morning. Geez. |
| 07-13-04 | Dad comes over and sees that everything I told him is true. I cannot tell a lie. We try to start the car and just get a click, or not even a click. We try the starters on the bench and they might work, if you whackem good, but probably not. If anything, things have gotten worse since I last looked at it. We tried cleaning the starter and that seemed to help quite a bit. We were hopefull as we put the best one (I can't keep track of which is which now) back into the car, again. We try to start the car and it goes "Wrarwrarwrar" but not like it should. It is kinda slow. And getting slower all the time. Sounds familiar, eh? Guess what comes next... jumper on the spare battery... and then guess what? So I take the starter out again... I am getting good at this now... it takes me all of about 4 minutes. We called Bill earlier to see if he had some extra starters. He says he has a bunch but he has to locate them. When Dad goes down to the shop to gather them from Bill... Bill couldn't find them. They have gone missing. The day ends with Dad going home to rebuild the starter and I have a go-to of getting the front bodywork on. |
| > | So now I try the starters on the bench. One will spin up, slowly, gradually gaining speed. But it is never "fine." The other will not work at all unless whacked with a hammer, smartly, repeatedly. |
After filling the system with water and Redline WaterWetter, I decided to start the car to see if there were any bubbles in the sytem. So, I put supertrapp on, install the starting plugs (Champion UK10) and roll the car into the driveway. I disconnect the throttle linkage so that I can operate it by hand, turn on the kill switch, fire, fuel... And hit the starter. It goes "Wrarwrarwrar" but not like it should. It is kinda slow. And getting slower all the time. Aha... The battery must have gone south! "Crap" After placing a call to the Poconos to talk to my Dad I gather up a spare starter from his basement. It takes me a while to remove the bad one and install the new one, maybe 45 minutes. It is a tight spot and there is no straight shot for one of the mounting bolts. Hit the starter button... "click." "Crap" |
|
The new radiator is installed. There was some mixup with the two coolant ports as they don't point the same direction now. We modified the shrouds to accomodate. Dad took the tinsnips and cut out the required clearances. I made some patches out of galvanized roofing flashing and pop riveted them on. It may not be pretty but I think it will be functional. |
|
| 06-23-04 | The new harness-belts arrived and Dad gave them to me to install when I stopped off to pick up Saabina after work. I was working in the garage later that evening when he showed up on his bike and helped me put them in and get them roughly adjusted. While glancing over the car we got to looking at the coolant resevoir. When we took off the cap it suddenly occured to me that there was no "shiny spot" marks on the seat-seal area in the fill-neck. THAT would mean the rubber seal of the cap wasn't really sealing the coolant system and woould explain why it pushes all its coolant out when we run. So we put in a 7 lb cap that I had on hand and used an additional piece of rubber seal from yet another cap I had on hand to take up some of the gap between the seat-face and the cap. I think it does and I think we may have finally fixed our cooling problem! Combine that finding and fix with the new radiator that Ralph is building for us and we should have NO trouble keeping things cool. |
| sometime in here | I completed the construction of the new steering column and installed it.
Pictures will follow! |
| 06-01-04 | I welded the lower hexagonal piece onto the stainless tube and that makes it the new steering column. I wire wheeled the stainless and welded portions to make them all shiny. I need to paint the non-stainless parts but I think I'll leave the main tube shiny metal. |
| 05-31-04 | I welded the upper joint and crushable section to the stainless tube tonight. To make sure I got a good weld I drilled four holes into the outer tube so I could weld through to the inner tube. It worked fantastically. |
| 05-30-04 | Jeff and I took Sam's Daimler up to Ralph's house to drop off the Quantum radiator to be re-cored and repaired. |
| 05-26-04 | Today I collected an upper portion of a 900 steering column (the bit with the sliding shaft surrounded by a weblike crushable structure) and I cut 2" off the end with the splines that match up to the U-joints I am using. That piece will get welded to a small plate of steel with three bolt holes drilled in it to match up with the splined clamp that bolts to the steering rack. |
| 05-25-04 | Sorry for the lack of updates. I'll try and go back and fill in the spaces when I can. Tonight I spent a little while working on redoing the steering column. I am using U-joints from SAAB 900 steering columns. The lower portion of the 900 column has two U-joints and a crushable section. I am using two upper U-joints (from that section of the column) and one piece of crushable section in my redesigned steering column. The joints are FREE to me because I get them from the Sports Car Service scrap metal pile. See... The lower portion of the steering column on the 900 has one U-joint that goes right to the steering rack and sits out in the weather. The other joint is inside the car its entire life. The one outside in the weather goes bad but the one inside is like new. Sports Car Service throws the whole assembly into the scrap metal pile to be recycled because the lower is junk and the uppers never go bad. FREE good used race car parts! Horay! |
| 04-28-04 | Dad mounted and balanced the newly straightened (by VikingWheel Wheel Straightening and Repair). He also made a support to brace the solid tie-rod on the left rear. Unfortunately, he only had one piece fo suitable material so couldn't make a matching piece for the right side. Put that on the ToDo list. I cut out a new water pump gasket before going over to work with Dad. I reinstalled the water pump with new gasket and old cleaned-up pump seal. Then I taped the wheel weights to the wheels while dad bolted them to the car. We rolled it out to fill it with water. When we filled it with water... the pump leaked. So, I removed the pump and we stuck in Bill Jacobson's new seal. Reassembled the pump and refilled with water. It leaked again! Out comes the pump again, this time the whole thing. We used Bill's entire rebuilt pump... housing and seal and my new cut gasket. Filled it with water and it finally held water. No leaks. But what a pain it was. |
| 04-26-04 | Attempted to replace the inner driver boot on the right side driveshaft. We removed everything necessary but in the end... the little ring that captures the axle in the outer joint broke... so we gave up and put some new grease in an old spare axle and put that in the car. We will need to rebuild the original one for the future though, as the rubber boots on the spare (currently on the car) are not in the best condition. |
| I "horse-traded" Wally at Viking Wheel, website work (me) for straightened wheels (Wally). | |
| 04-20-04 | Dad and I troubleshot the running issue on the car. Dad had installed the Pertronix Ignitor that I bought for it in a spare BR8 distributor, and we tried that. No fire at the plug, but we were getting a significant spark at the coil when setting the static timing. So not having a spark at the plug made very little sense. So we reinstalled the old distributor and that didn't work either. So while fiddlign with this and fiddlign with that lookign for the problem I looked at the distributor cap... and saw an odd looking trail running from one of the plugwire nodes to the coilwire node... a crack I guess. Anyway THAT was the whole problem. It was runnig on two cylinders (at best) since most of the spark was being tracked away by that crack. We put in a good used cap and it fired right up on the old BR7 distributor. We reinstalled the BR8 with the Pertronix and it fired right up on that too! So, that's what is in the car now and will be for VIR. Hopefully, it works well. The advance curve is a little different and not quite as nice as the BR7 so we'll have to see how the power is. |
| 09-20-03 | Dad and Jeremy and I pulled the engine out of the car to see what was wrong. Well there were big things wrong. It toasted a bearing carrier and a couple of the crank bearings are shot and the one piston is slightly melted. Pictures of the damage here. |
| July 19th and 20th | RACE! VSCCA Pittsburgh Vintage Grand Prix Race Report |
| 07-16-03 | I tightened all the wheel bearings. Dad and I rebuilt a spare master cylinder... only to strip the threads in the forward brake line port. Crap. |
| 07-15-03 | Bled the brakes with my homemade pressure bleeder. Used ATE SuperBlue Racing brake fluid. There are NO air bubbles in the system and yet, the pedal is still very soft. I made and installed a new set of spark plug wires. *Note: The boot supplied and installed on the coil end of the coil wire was too small. At Pittsburgh this caused the coil wire to work free from the coil. |
| July 2003 | Dad installed the Accel SuperCoil ($50.00) |
 Shift fork issues from VIR.
 This
This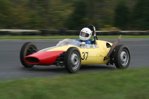
-STEFAN Vapaa
|