project log...
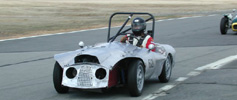
1959 Quantum One
The Quantum One was designed and built by Walter Kern in 1959. It has a very interesting history and many stories surrounding it. It is believed that the chassis was fabricated by workers whos day-jobs was manufacturing computer chassis for IBM, and that the body was fabricated by HVAC guys. Some stories may have been embellished, and that is part of its charm, but the car is undeniably NEAT!
|
| Date | Description |
|
|
| 06-14-06 | Dad had found some decent used wheel bearings, still in the spindles. He was having trouble getting the locknut off though. So I helped him beat on them with a hammer and a special-tool-of-destruction he'd custom made earlier. In the end, it was a chisel that prevailed. |
| 06-11-06 | Wow... That was lucky. We have new drivers, clamshells and rubber donuts ready to go in. But first we want to install some solid motor mounts. We think the reason that the driver-retaining bolt was all beaten into a shroom was because the enine was rocking too much in that direction. Solid motor mounts should help. |
| 06-03-06 | Dad pulled the hub and spinle off the car and will seperate the axle from the assembly and press in a new bearing at his earliest convenience. In the meantime, we noticed that the inner driver is really in bad shape. The rubber donut is almost gone and the metal clamshells are getting beaten up. We tried to remove the inner driver, but ran into an issue. The head of the retaining bolt is all mashed and mushroomed. Seems the axle was running into it? So that complicates matters (a bit) and means we have to figure out a way to further space out the front spindles. |
Upon return to my garage I pulled off the LF wheel and looked around. Yup, something's not right. But I didn't have the hub puller so I had to wait for any further diagnosis. |
05-01-06 | Well, things did not go quite as planned. The car didn't run correctly all weekend. We still don't know why. In chasing the issue, we swapped out the new Pertronix-ed distributor and put in a spare BR7 distributor. Didn't fix anything although it seemed to run better when it was too far advanced. By mistake Jeremy installed it so it was set to 10 degrees BTDC static. That's equivelant to 30 degrees BTDC at speed. We fixed that, but it still didn't run right. Finally, in the last race, the car broke something in the left front spindle. I don't know if it is the wheel bearing or what but the wheel just wobbles around on there. We need to get it off to see what the issue is. |
| 04-26-06 | Car is cleaned up and loaded on the trailer ready to roll. VIR here we come! |
| 04-24-06 | I removed the old plumbing insulation and used up my stick of SFI spec rollbar padding on the rollbar. |
| 04-17-06 | Dad came over after I got home from work and we bled and adjusted the brakes. Good pedal! We even adjusted the e-brake, which was way outta wack. |
| 04-16-06 | With the new Pertronix in the car, she fired right up and Dad drove her onto the trailer. He played musical cars and moved the Formula S from the warehouse to his garage and the Que-One from his garage to mine. |
| 04-14-06 | Dad sent me an update e-mail for his work on the Qeue-One today: Stefan -- I ended up spending all afternoon working on the Quantum, but got the new master cut-off switch installed. I also removed the Petronix from the BR8T distributor and installed it in the BR11T distributor, which I then installed in the car. Checking the timing isn't as straightforward as with the points, but if the marks on the distributor are correct, it should be OK (I set the #2 piston appropriately before removing the distributor). So we'll need to start it up to check it, but hopefully it will be OK. We need to replace the coolant, as there is still some antifreeze left in it from Summit Point. I also think we'll need to make some adjustments to the carburetor jets -- I'm pretty certain it was too rich, which may have been part of our problem at Summit Point. |
| 04-07-06 | Ordered NGK Iridium spark plugs (14mm) to use with the spark plug adapters. |
I bought some sparkplug adapters (from West Of Sweden) for this car and the Formula S, so we would be able to use NGK Iridium plugs. I still need to decide on plug temp and get some of them. |
|
| 03-28-06 | Whoa! A whole year since I updated this log. Not good. |
Dad and Jeremy did a lot of work on the brakes. It was rather a challenge to get the drums off, but they managed when a real official SAAB 5 bolt hub puller was brought into service. |
|
Dad bought Supertrapp weld-on ends for a bunch of the cars, and this is one of the ones that will get it. You just weld on the end and then you can screw on or off the plates depending on whether you want to make it quieter, louder or simply remove them altogether (my preference). |
|
We keep smooshing the exhaust at its lowest point where it comes out of the expansion chamber. We are planning on pre-smooshing a big piece of pipe so it will clear and then necking it down to fit the 2" system. |
|
| 03-27-05 | Dad completed the mounting and hookup of the new oil tank. That made the car ready to test start. So we did... Pictures to follow. The cloud of smoke from the winter-pickled engine was... Significant. The fuel pressure was too high and fuel was spraying from all the fuel line connections at the carbs. Dad fixed that with a full counter-clockwise turn of the new Holley fuel pressure regulator. Also, the expansion chamber wasn't tightly bolted to the exhaust manifold. I fixed that while the car was running. It is ready to go racing. |
| 03-20-05 | Down at the southern team headquarters in Durham, NC... Jeremy and Dad fabricated a new aluminum oil tank and solid steel motor mounts. |
| Early March, 05 | Dad rewired the entire car. It was a mess. |
| 02-27-05 | Dad and Jeremy were just wrapping up their efforts on the Q1 when I showed up. I recalled that the rear motor mount had some small cracks when I looked at it prior to last season. I suggested we check that to make sure things hadn't gotten worse. At some point during the season, we broke the torque rod (bolted to the head of the motor and the side of the engine bay) that limits the movement of the motor. Apparently, this bent the rear mount and made those cracks a good deal worse. We dug into the problem. I fabricated some gussets and Jeremy welded the cracks and the gussets in place. It should be good until we get a chance to remove the motor and rebuild/refresh the mount. |
| 02-25-05 | Dad and Jeremy spent all day working on the Q1. They replaced the A-arm bushings with the Delrin ones Jeremy fabbed and weld-repaired some cracks in the suspension mounting points. In my Dad's own words: |
| 02-19-05 | Jeremy finished the fabrication of the Delrin bushings for the front suspension. He's bringing them north from North Carolina this weekend and will install them then. |
| 07-10&11-04 | VSCCA at Beaver Run Again, a very successful event for the Que-One! The only problems were minor teething issues. Well, the stuck throttle (caused by the battery shifting under the immense cornering forces Jeremy was putting her through) that resulted in a spin and tow back was maybe not "minor" but it was easily solved and did not result in damage. Since Beaver Run is mostly right hand turns, and the driver sits on the left... the left rear tire was working pretty hard. Second only to the left front tire. The rear one however managed to open up a bit more room in the wheel well. Each time Jeremy threw the car into one of the right handers the tire would rub against the aluminum bodywork at the front of the wheelwell. So it tore itself a new one. No real big deal. Jeremy simply took a hammer to it and rolled the edge back so it wasn't sharp. We may have to make a patch though. I suspect water might get flung up through there if it rains. It continues to suck down remarkably little oil. The running issues have not been solved because we haven't changed anything. Jeremy drives it with the choke pulled out a little to richen up the mixture and cure the 3rd-to-4th upshift hesitation. That doesn't help with the fact that it completely goes flat in hard right turns. I suspect the fuel is sloshing away from the pickup in the fuel bowls or the fuel floats aren't moving properly or something like that. It is maddening really as the only way to cure it is to drive slower. |
VSCCA @ VIR All good. Report to follow. |
|
Various bits of work were done in here. I'll organize them better when I get a chance to look at my Dad's notebook. Jeremy welded the right front shock mount better... it was cracking its welds. |
|
| 04-17&18-04 | VSCCA Pocono was a major sucess for the old girl. Jeremy drove her well and even Dad got in a couple laps. There seems to be a carburetion problem in the turns and on the 3rd to 4th upshift. The power will fall off and revs will drop. We are going to try and change the float level and see if that helps. Pictures are here. |
| 04-07-04 |
Well... "Two steps forward three steps back." Isn't that what they say? I arrived at about 5:00 (lots of traffic between work and Jake's) and Dad had been there for a while and was working on fabricating some mounting pads for the rollbar. He was ready to tack weld a couple things so I set up the MIG welder we borrowed and put the weldables in place. Hmmm. Crappy welds? We're out of Argon! Can't do that now. So on to the next thing. The ignition cylinder is spinning in the dash and the loose installation causes the ignition to be a little flakey. So I try to tighten it down. But the previous owner or someone must have cross threaded the big locknut on the cylinder because it just won't stay tight. It almost gets tight but then it gets loose again as it spins on the threads. So I pull it out to get a better look at the problem. Dad suggests that we just bolt the wires together and use the cutoff switch as the On/Off switch... which would be fine except the driver can't reach the cutoff switch when belted in so he/she would have no way to turn the car off in an emergency while still belted in. So I go ahead and bolt them together and tape them up and suggest we find a toggle switch as soon as possible. Another thing started that can't be completed. I put on the wheels and started to put it back on the ground. I lowered the front first. There was a sound... like a babbling brook. I look under the car and see a shiny puddle, being dripped in, by sticky looking stuff. I get a look from a different angle and see the puddle is a nice blue color. Brake fluid. ALL the brake fluid. Seems when Sam and I bled the brakes last weekend and put the master cylinder through it's paces we must have damaged the piston seal. So the fluid in the resvoir all leaked past the seal and into the rubber boot on the front of the master cylinder and when that filled up it all went onto the floor of the car and then down through the cracks until it settled on the floorpan panels. There it would sit until the car was tilted and it ran out... free! Dad has a lot to do tomorrow before we get together to work on the car. He has to first figure out which Lockheed brake master cylinder we have, then find a rebuild kit for it, and then rebuild it before I can reinstall it and re-bleed the brakes. ...And there's other stuff to do too. |
| 04-03-04 |
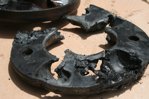
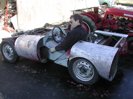
Over the past week Dad has accomplished quite a few things. He mounted and balanced the new tires to replace the leaky old ones from the Quantum Formula S. He collected a bunch of supplies so we'd have everything we needed to make headway today such as roll bar tubing and sandpaper. We started the dayt with me putting together the tubing bender and figuring out a way to tie it down to the floor. Once I completed that, we bent the rollbar... which was fun and it turned out very well. We repaired and modified the battery mounting and re-installed it. Dad attached two new "Ray-Dot" mirrors which look much better than what was on there. Further dent-removal and sanding of the body panels was done and then we reinstalled most of the panels. Sam helped me bleed the brakes. His comment was that the brake fluid that came out of this car's brake system was the yuckiest he'd ever seen. "Eew" I think was his exact wording. He also attached the Saab grille and installed the fronticepiece. The bodywork will need to have quite a lot of further sanding done and then the final polishing, but at least most of the dents have been removed and the color is "uniform." Pictures are here. |
| 03-27-04 | More Cleanup! Dad and I worked on getting the Quantum ready for Pocono some more this Saturday. I test fitted the new 450-15 Dunlop vintage race tires that dad had mounted on his newly refinished (by Viking Wheel) Sonett "Cromodoro" wheels. They look and fit much better. But, the two old tires from the Quantum are done for. They leak through the sidewalls, fast. So dad is going to buy a couple more tires this week (at $206 a pop) or he might decide to buy a couple tubes to fit inside the tires. We removed the side body panels (also, they are most of the floorpan) and the battery box. I replaced the rusty brake fluid resevoir and feed hose with a plasic one Dad picked up over the week. I adjusted the freeplay in the throttle cable. I removed the brake light and was amazed to find one (brand new) almost exactly like it sitting on the table next to the car. Seems Frank Porter had brought a trailer light with him either to replace one on one of th etrailers or as a spare to leave with us. What a coincidence! Lastly, we did more paint stripping. Pictures are here. |
|
Dad bought two new 450-15 Dunlop vintage racing tires ($412.00). He had the crack in the fronticepiece welded and spent a good bit of time with some 230 sandpaper and a hammer sanding smooth and dinging flat the doors. |
|
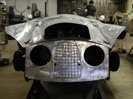
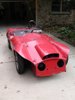
| 03-13-04 | Cleanup! Sam helped Dad and I pull most of the body panels off including the doors. I sprayed degreaser in the enginebay and hosed it down. Should be a bit nicer to work on now. Sam tested the idea of polishing the fronticepiece. It will be a lot of work but should look a lot better. Dad spread paint remover on all the body panels and we scraped and brushed all the old paint. Most of it came off easily. Pictures are here. |
| 03-07-04 |
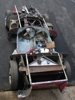
Took the car down to Jake's. There we will prep it for the race season. But before we tore it down I test drove it around the "test track" a bit. It seemed to run strong and everything worked well. It starts easy and doesn't foul nearly as quickly as the Formula S. The brakes feel strong and even. It corners really well... on wet grass!
I got it all muddy so I had to wash it. Then we pulled off some body panels to see how the roll bar was installed and check on the fuel tank. There are pictures here.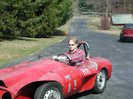
|
| 03-13-04 | Purchase! Dad bought Walter Kern's first Quantum... the Quantum I/II! Pictures are here. |
-STEFAN Vapaa
|